
How to run Llama 2 on an average GPU in Windows using 4-bit quantization
Tired of sharing your personal data every time you prompt ChatGPT? Things just changed! Since Meta released Llama, running your a LLM in your own machine is possible!. If you have a capable enough GPU, this guide will show you how to start prompting your own PC!
Introduction
Large language models like Llama2 have shown remarkable potential in various natural language processing tasks. However, running these models on resource-constrained hardware can be a challenge. Fortunately, with the right techniques, you can still achieve impressive results using an average GPU and 4-bit quantization.
Requirements
Step 1: Request access to the model
Meta publishes llama-2 through their main website. Click on Download the model, submit the form and you will receive an email with the instructions on how to make it to your machine.
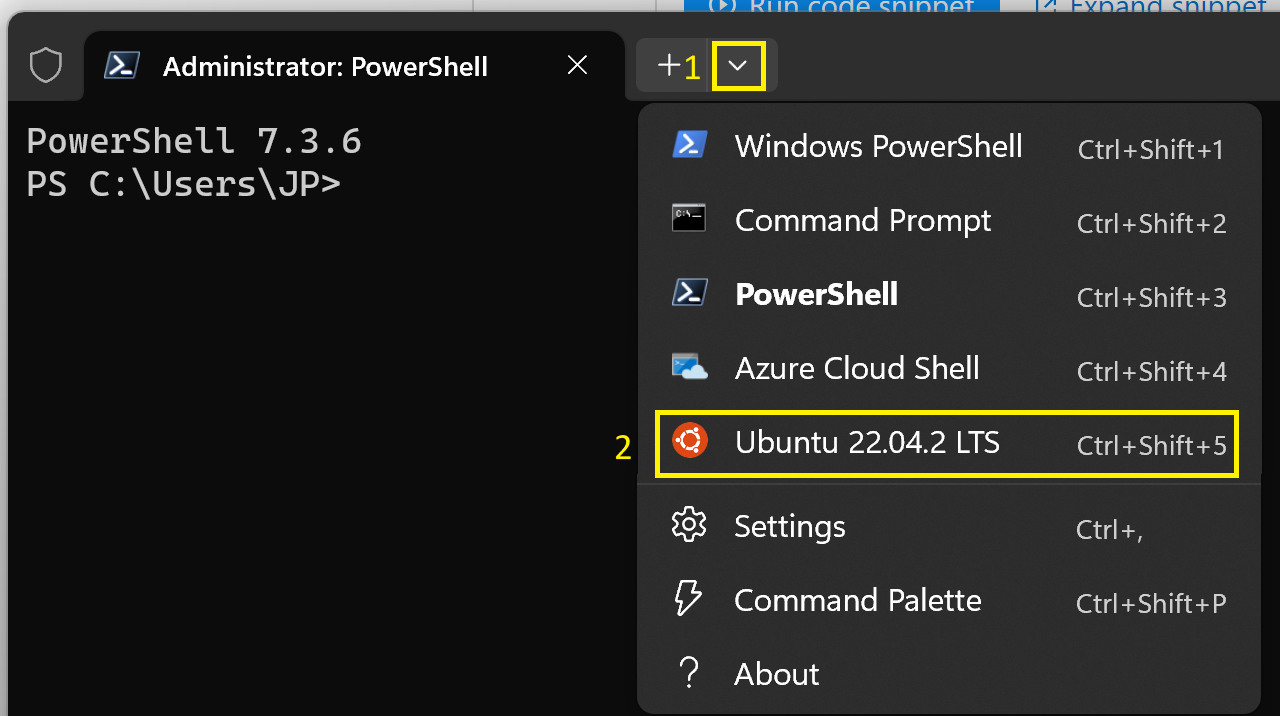
Step 2: Prepare the llama repository workspace
In order to make llama work, you will have to clone the official repo to WSL2.
In order to do this, you have to get into your Ubuntu installation on Windows. One easy way of doing this is by using the Windows Terminal application, selecting the Ubuntu distro among the options in the tab-dropdown.
Note that if it is the first time you log into Ubuntu you will be prompted to create a new user.
If you successfully got into Ubuntu, you will be standing at your home directory /home/<username> also known as ~ , a good place in which to clone the repo! You can do so by just running the following command:
# Ensure location at home directory
cd ~
# Clone the repository
git clone https://github.com/facebookresearch/llama.git
Now you will find the folder llama under your home folder.
You will also have to setup a virtual environment with all the required modules installed in it, for that you can do:
# Get into the repo folder
cd llama
# Create a virtual environment in the folder "venv"
python3 -m venv venv
# Activate the virtual environment
source venv/bin/activate
# Install all the dependencies
python3 -m pip install -e .
A nice way to explore the repository in your Ubuntu distribution is using an IDE. If you have Visual Studio Code installed into your system, you can do so by just using the following command code .
Step 3: Get the desired model
It is very likely that your consumer-end-machine will not stand any model but the 7B (you are welcome to try though), so my suggestion is that you start with these ones. The one we will download is the one fine-tuned for chat, the 7B-chat model, and in order to do so, you will have to run the script download.sh in the cloned repo.
Note that you will need to copy the EMAIL_URL that meta sent to your email when you submitted the form.
# Make sure the file is executable
$ chmod +x download.sh
# Run the script
$ ./download.sh

"Enter the URL from email:"
<EMAIL_URL>

"Enter the list of models to download without spaces (7B,13B,70B,7B-chat,13B-chat,70B-chat), or press Enter for all:"
7B-chat
After the model is downloaded, you can try to run the example scripts provided in the repo as described in the README.md.
torchrun --nproc_per_node 1 example_chat_completion.py \
    --ckpt_dir llama-2-7b-chat/ \
    --tokenizer_path tokenizer.model \
    --max_seq_len 512 --max_batch_size 6
If everything runs for you then congratulations! You can start using your LLM locally. If not and you end up having a torch.cuda.OutOfMemoryError: CUDA out of memory. error, then my friend, you will have to rely on quantization!
Step 4: Quantize the model to 4-bits
In order to run the model, we need to make it smaller, thus, we can rely on quantization. This might seem difficult, but luckily someone provided a solution for it at the repository ggerganov/llama.cpp.
Just like before, clone the repository to the home folder.
# Ensure location at home directory
cd ~
# Clone the repository
git clone https://github.com/ggerganov/llama.cpp.git
Now you should move the downloaded 7b-chat model and the used tokenizer to the models folder in llama.cpp.
mv -r /llama/llama-2-7b-chat/ llama.cpp/models/
cp /llama/tokenizer.model llama.cpp/models
In this case you will have to build and compile the project as instructed by the Makefile. In order to do so, just follow these instructions:
# Get into the repo folder
cd llama
# Compile the project
make
Set the python environment just as before.
# Create a virtual environment in the folder "venv"
python3 -m venv venv

# install Python dependencies
python3 -m pip install -r requirements.txt
We are getting there. Here is where we actually quantize the model.
# convert the 7B model to ggml FP16 format
python3 convert.py models/llama-2-7b-chat/

# quantize the model to 4-bits (using q4_0 method)
./quantize ./models/llama-2-7b-chat/ggml-model-f16.gguf ./models/llama-2-7b-chat/ggml-model-q4_0.gguf q4_0
Everything is ready now. If you correctly followed the steps, you should be able to start talking with Bob, your new personal AI assistant. Just run:
./main -m ./models/llama-2-7b-chat/ggml-model-f4_0.gguf -c 512 -b 1024 -n 256 --keep 48 --repeat_penalty 1.0 --color -i -r "User:" -f prompts/chat-with-bob.txt
FAQ
What is quantization?
Quantization is a process in which you represent numerical values with a limited number of discrete levels or values. In the context of computing and digital signal processing, quantization is often used to reduce the precision of numerical data in order to save memory or computational resources.
4-bit quantization specifically refers to the process of representing numerical values using only 4 bits of information. A single bit can represent one of two values (0 or 1), so with 4 bits, you can represent 2^4 = 16 different values. These values are typically evenly spaced within a certain range.
For example, if you’re working with a continuous range of values, such as the amplitude of an analog signal, 4-bit quantization would involve dividing that range into 16 equally spaced intervals and mapping each interval to a unique 4-bit binary code. The precision of the representation is limited to those 16 distinct levels, which means that the original continuous values are approximated by the closest representable level.
How to get rid of EOF-related errors?
If you end up having EOF-related errors, make sure your files use the LF end of line sequence. Using the repository with Windows-tools can cause the line sequence to appear as CRLF, in which case the scripts you have to run will be broken. One way of solving this is by running dos2unix as described here.
Leave a comment